# How to make Basic Web Socket with spring
### Intro:-
Unlike, HTTP, web socket allow both client and server to communicate with each other, independently at the same time. Web socket is an event -driven protocol, and it is use for real time communication. Web Sockets keeps a single, persistent connection open while eliminating latency problems. web socket is a stateful protocol which means connection between client and server will always keep alive until and unless terminates by either side. TCP is foundation for web socket. Either client or server initiate connection , called handshake. Messages can by send bi-directional. All the modern browser supports web socket. Some of the use of web socket are:-
social feeds
chat
multiplayer game
update of game/tournament
collaborative editing
online education
### Task:-
You are going to create simple web socket app
### Software Requirements:-
Ubuntu-20.04 +jit [linux-x86_64]
Open Jdk 8
Spring Boot 2.2
### Level:-
Beginner
### Prerequisite:-
Knowledge of core java and text editor/NetBeans IDE
### Step 1:-
Adding Maven Dependencies
complete pom.xml file
```
4.0.0devnationspring-boot-web-socket-user-notifications0.0.1-SNAPSHOTjarspring-boot-web-socket-user-notificationsSpring Boot: user notifications with web socketorg.springframework.bootspring-boot-starter-parent1.3.5.RELEASEUTF-8devnation.Application1.8org.springframework.bootspring-boot-starter-weborg.springframework.bootspring-boot-starter-thymeleaforg.springframework.bootspring-boot-starter-securityorg.springframework.bootspring-boot-starter-websocketorg.springframeworkspring-messagingorg.springframework.bootspring-boot-starter-integrationorg.springframework.bootspring-boot-maven-plugin
```
### Step 2:-
Configuration
```
@Configuration
@EnableWebSocketMessageBroker
public class WebSocketConfig extends AbstractWebSocketMessageBrokerConfigurer {
/**
* Register Stomp endpoints: the url to open the WebSocket connection.
*/
@Override
public void registerStompEndpoints(StompEndpointRegistry registry) {
registry.addEndpoint("/ws").withSockJS();
return;
}
}
```
@EnableWebSocketMessageBroker enable broker-backed messaging over Web Socket using a higher-level messaging sub-protocol.
Register the "/ws" endpoint, enabling the SockJS protocol.
SockJS is used (both client and server side) to allow alternative
messaging options if WebSocket is not available.
The registerStompEndpoints method registers the “/ws” endpoint, enabling Spring’s STOMP support.
This endpoint, when prefixed with “/app”, is the endpoint that the ChatController.send() method is mapped to handle.
It also enables the SockJS fallback options, so that alternative messaging options may be used if WebSockets are not available.
The fallbacks let the applications use a WebSocket API but gracefully degrade to non-WebSocket alternatives when necessary at runtime.
### Step 3:-
Security
```
@Configuration
public class WebSecurityConfig extends WebSecurityConfigurerAdapter {
@Autowired
public void configureGlobal(AuthenticationManagerBuilder auth)
throws Exception {
auth
// Defines three users with their passwords and roles
.inMemoryAuthentication()
.withUser("DevNation").password("DevNation").roles("USER")
.and()
.withUser("EngineersNation").password("EngineersNation").roles("USER")
.and()
.withUser("ServerNation").password("ServerNation").roles("USER");
return;
}
```
Enable authentication with three in-memory users: DevNation, ServerNation and EngineersNation.
Spring Security will provide a default login form where insert username and password.
### Step 4:-
Create a Message-handling Controller
To configure the mapping of web requests, you use the @RequestMapping
annotation.
The @RequestMapping
annotation can be applied to class-level and/or method-level in a controller.
The class-level annotation maps a specific request path or pattern onto a controller. You can then apply additional method-level annotations to make mappings more specific to handler methods.
```
@Controller
public class MainController {
@Autowired
private SocketificationService socketificationService;
/**
* GET / -> show the index page.
*/
@RequestMapping("/")
public String index() {
return "index";
}
/**
* GET /socketifications -> show the socketifications page.
*/
@RequestMapping("/socketifications")
public String socketifications() {
return "socketifications";
}
// Send the socketification to "DevNation" (by username)
socketificationService.socketify(
new Socketification("SpringbootWebSocket"), // socketification object
"DevNation" // username
);
}
}
```
### Step 5:-
Create a Browser Client
After making your configurations in the server-side, you'll use the sockjs-client library to build a simple HTML page that interacts with our messaging system.
you will import sockjs and stomp Javascript client libraries.
```
You are logged as: [[${#httpServletRequest.remoteUser}]]
(logout)
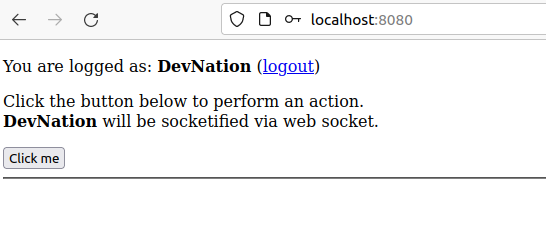
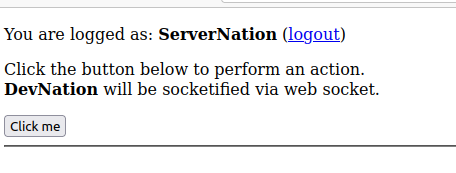
Click the button below to perform an action.
DevNation will be socketified via web socket.
```
### Step 6:-
Run the App
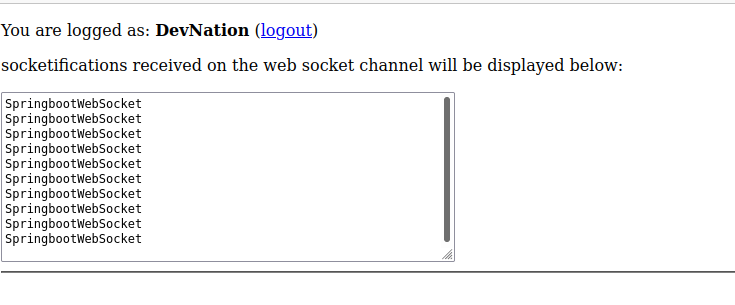
$ `mvn spring-boot:run`
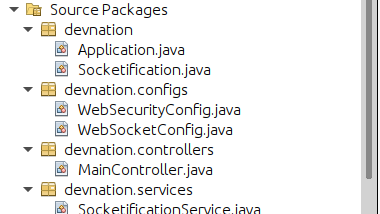
**Folder Structure**-
### Conclusion:-
After performing above steps, you make a basic web socket app with spring boot.
In this tutorial, you've explored Spring's WebSocket support. you've seen its server-side configuration and built a simple client-side counterpart with the use of sockjs and stomp Javascript libraries.